Before that big shoot…
When you’re getting ready for a shoot it’s very important to stay very organized. You probably have a lot of equipment that needs to be looked after and kept in one place, and it can be difficult to keep track of everything.
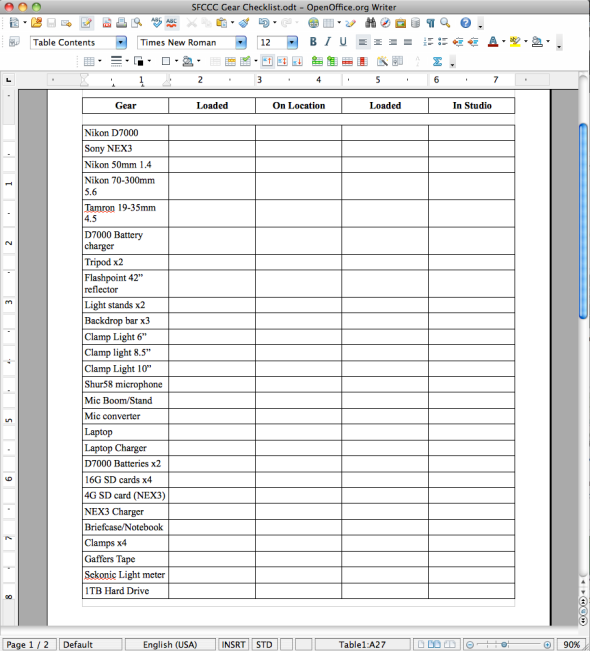
Before any shoot I make up a check-list in word or office that itemizes every piece of equipment that I will be bringing along on the shoot. It lists everything from cameras and lenses to clamps and gaffers tape. Then I have at least 4 other columns where I go through the check list and each point it travels. A check for loading up before the shoot, a check for arriving on location, a check for the end of the day and a check for unloading back at my studio. This will save your little pieces of equipment and save you some money in replacing those little pieces in case you leave them at your shoot location.
The following example is a check list for a video I’m shooting this month for a local healthcare organization:
This is just the first page, as the second page lists all of my cables that are required as well as flags and other misc grip gear. Your check list will probably go through a few drafts, so don’t make it the night before the shoot. Carry around a little notebook with you not only to write down ideas but to remind yourself of items that need to be added to your list. It will save you a lot of trouble in the long run.
Your portfolio: It’s never finished
So for the last few weeks I have been working on my portfolio. Not shooting for it specifically, because you know, you’re ALWAYS working on your portfolio, what I’m talking about is physically ASSEMBLING a series of prints into a book to show to current and potential clients.
Building a portfolio is hard. You have to somehow set aside your pride and ego and look at your work objectively so you can edit, arrange and make it the best presentation of your work. Sometimes a favorite photo of yours has to be edited out, because it doesn’t fit with the rest of them. This alienates you, because you feel such a great attachment to this photo. So you go back and fourth and back and fourth and you question your worth as an artist and pretty soon you don’t even know who you are anymore.
So yesterday I made the mistake of saying “My portfolio is DONE. This is the most comprehensive collection of my work that I have ever put into a book.” Well first of all, of COURSE it is. It SHOULD be, being the newest work. Mixing in some old with the new, it should cover all the things I’m good at and show the new things I’m good at. Second of all, a portfolio is NEVER done.
I was showing this book to a client today, and between the time I had said that and this morning I had a little itch at the back of my neck. I kept going back and going through the portfolio, over and over again. By the time I got to the meeting with the client I was very nervous, and it was all because I declared to myself that it was “Done.”
So here’s a few tips to avoid that stress:
Consistancy
Your portfolio needs to show your absolute BEST work. Even something a little bit weak will bring the rest of the images down. Choice of subject is very important. If you’re a still-life photographer show-still life. If you shoot people show people. Your lighting, techniques and moods should be similar, but not the same for every image. It’s ok for you to take sensitive portraits of someone and later in the book show something with a sense of humor, as long as it still looks like it was taken by the same photographer.
Versatility and Flow
This is going to sound hypocritical, but you must display consistency AND variety in your work, or you won’t be getting any. It doesn’t have to be a huge shift, but just enough to get your client to look a second time. This also creates a flow throughout your book, you need to keep visual interest. The last thing you want the flow of your book to flatline, it’ll be boring. You want it to ebb and flow, rise and fall, over and over again.
Edit, edit, edit
Make little thumbnail prints of all the images you want to include in your book, and lay them out. Remove the ones that don’t work, and then do it again. And again. And again. Then have a few friends over for some drinks and have THEM look at it. Show it to a peer, or graphic designer friend. Your portfolio should contain no less than 10 photos (Any fewer would be too short) and no more than 20. (Any more would be ridiculous) And remember, nothing but your VERY BEST.
Hopefully this will help some of you out there deal with the stress of portfolio building and showing better. My meeting went fine, as long as you believe in your work (And it’s good work) and show confidence throughout your showing you will have a better chance than some of coming through and getting a new client.
Photography School: Visual Style
When you’re trying to get work as a freelance or professional photographer, you really need to look at how your photographs look.
I don’t mean simply looking at them, I mean looking at them as a whole. Do they all have a similar “feel” to them? Something that will make people think of you when they look at it?
Photographers are hired based on a certain “look” that their work has. It’s what separates you from the other photographers out there (And there are a LOT of other photographers out there) and it makes your work unique and valuable.
I can’t stress this enough; Your work needs to have a consistent look across the board, they have to scream “I took these,” not “Anybody could have taken these.”
It’s all about practice. You won’t get your signature look over night, it’s something that photographers struggle with every day. Now don’t be dragged down by shooting everything “The same way,” it doesn’t really work like that. It’s about how you approach your subject matter. Take a look at these photos:

I took both of these photos, but stylistically they have almost nothing in common. The first image was taken very recently, after I felt established comfortable shooting things a certain way. The second image is from a long time ago when I was shooting senior portraits in small towns. These days, I couldn’t even imagine shooting something the way I shot this second image, it just wouldn’t feel right to me.
So here is a list of things you can do to help you establish a visual style for yourself:
Copy another photographer’s style.
This may seem like cheating to some, but it really helps. Pick a photographer who’s work you admire and make a list similar to the list you made before, of things that give him or her their visual style. Really analyze their images, what’s consistent? Low contrast? Strong side-lighting? After you have spent a good deal of time analyzing, attempt to copy this style.. You can either copy the visual style, or copy the image directly – either way you will be in for a huge challenge. If you really want to challenge yourself, take your favorite photographer’s style and use it to shoot subject matter that they never shot. If they shoot people, shoot still life or landscapes.
Pick 3 or 4 things you like to see in photography.
No more, no less. These things can be “high contrast” or “Low depth of field” or “Very saturated colors.” Make sure they are all based on photography, nothing general like “People” or “Landscapes” etc.
Then go out and shoot everything you can this way. If you feel you need to give yourself an assignment like “5 portraits in this style” then do so. Be a ruthless editor. Stick to your style like it’s a contract, and throw away any images that deviate (even slightly) from your chosen visual style.
Don’t get too comfortable.
After you have shot a lot of things in the visual style you have chosen, take your style write up and write down the exact opposite of what that style is. If it was high contrast, make it low contrast. If it was low depth of field make it high depth of field. Make sure you make the subject matter the exact opposite as well. Then go and shoot it.
I am writing this after coming off of doing a particularly challenging assignment. Over the weekend I was doing landscape photography of sports fields. It was hugely challenging for me – I had to use wide angle lenses instead of normal or telephoto. I had to shoot in low contrast light instead of medium to high – it was crazy! But overall I think it was good for me, and going out of your comfort zone will be good for you as well. I’ll post the “Recreational Landscape” series later this week.
Selling yourself short
Something that every photographer struggles with is how to price themselves. Most of the time, they under-price themselves because they are scared that someone will say no. The problem with this is that it hurts the entire industry. If you set a new low for portraits (I’m looking at you, Craigslist photographers) you will be setting a new low for expectations of photographers and the services that we provide.
And our services are valuable.
Photography is everywhere, this is a very visual time whether it’s photo or video, and people that can provide this service well get paid well.
Start with some research. See what other photographers in your area are charging, because it’s different from city to city. You can’t charge a New York rate in a Mississippi town. Have yourself a minimum rate that you will go and shoot for, and you can figure out that minimum rate using the ASMP’s cost of doing business calculator.
Keep in mind that you will NOT be shooting 365 days a year, so it’s important that the work you take can pay your expenses on days that you’re not shooting. Which brings me to my next point:
Don’t charge by the hour. You will ALWAYS be selling yourself short, unless it’s some sort of event photography in which case you should have a minimum time for. Take for example, you charge 75.00 an hour and you’re heading out to shoot a portrait of a business man. His people have given you one hour with him but it takes you 10 minutes to do the portrait. His people will then decide to pay you for only 1/10 of your time. It happens.
If you can do a shoot in 10 minutes that was thought to take an hour to complete, this means that you are very skilled and should be paid more, am I right?
You should also remove the term “Day Rate” from your business vocabulary as well. It comes down to a time issue – if a client has you for 8 hours and you’re done shooting in 3 they have you for another 5 hours – which is time you could be spending managing your business.
And that’s what photographers are, businessmen. You have to know your numbers and be able to set your rates competitively. Don’t fly into the market and undercut your competition – that’s just tacky. Research, and price fairly. Are you better than a mall photographer with one of those “studios” in the middle of the floor? Then charge more. People will eventually come around and see that they get what they pay for.
Survival tips for new digital photography pros – Part I
If you’re new to the world of professional photography, you probably have a lot of questions. If you’ve been in the game for some time now, you’ve probably noticed that things are changing.
So what follows is the first of 2 parts on my advice on how to survive in these times of 65 megapixel cameras, VDSLRs and social media.
1. Know how to use your camera
When we get a new camera, we’re excited. We run outside or to the studio with it and shoot great pictures. The thing is, there’s a lot your camera can do that will not only make your pictures better, but there’s a lot your camera can do besides taking pictures. Open the manual. Read it from cover to cover. Know what to do when you get that “ERROR34” code. You will feel much more confident in your ability to shoot, problem solve, and you will generally handle yourself in a more professional manner.
2. Shoot constantly
With your manual all worn out and dog-eared, you can now begin to shoot. Shoot everything, take your camera everywhere. If your camera’s too big or too heavy, invest in a point shoot with a manual mode so you can keep your eye and skills sharp. Camera phones work fine for this as well, as long as you shoot constantly.
3. Shoot RAW
RAW is the most powerful file format for digital cameras. The editing possibilities are endless. There are plenty of free RAW converters out there, and Adobe’s Camera RAW is second to none. Learn it, use it, feel the power.
4. Know what you’re good at
In the beginning, you shoot everything. Portraits, still life, landscape. You need to specialize and develop a look for that specialty, or you won’t get hired. You can’t be good at everything, so you should focus on one area and master it.
5. Multiple Revenue streams
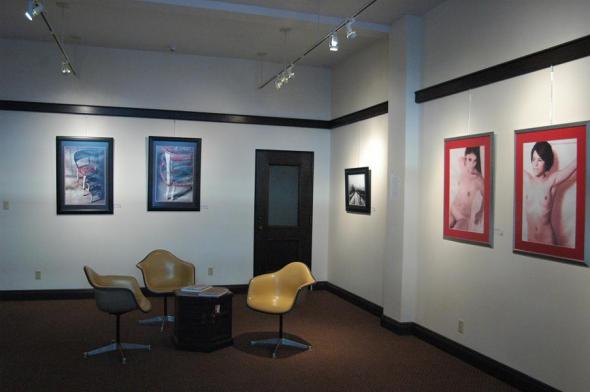
So you shoot portraits, what else can you do to make more money? You could try and teach a class on it, you could look into stock photography or you could have a gallery show. Find other ways to make money on your talent and ability. Teaching and seminars or lectures can be very rewarding, and a lot of schools and organizations need speakers on digital media because it’s changing so much and becoming so big. Stock photography, if you can get into it, can make you money on your photos while you focus on other things. It’s not guaranteed to pay your mortgage but it’s a good way to get your images in the public eye. Another thing is galleries, look into exhibition space in your area and what you have to do to get involved. There are many other ways to make money on your photography, sit back and brainstorm.
6. Never sell yourself short.
Set your rates and stay firm about them. You should never be ashamed of what you charge, you should come out and say them right away. You offer a great service at a great rate. NEVER give a “ballpark estimate.” You will miss something and end up under-cutting yourself. In these times you may need to be a bit flexible for yourself. Set a minimum and work for no less. If you’re not sure what to charge do some research on your competition. Don’t be a jerk and undercut everyone else. Be fair to yourself. As soon as you start shooting portraits for 50.00 you not only hurt yourself, but you hurt the market.
On friday I will post Part II. Stay tuned!
The Importance of Branding
Those of you who have visited my website in the last 2 weeks have probably noticed something a bit different. My name now appears in between two brackets and the brackets are a prominent feature throughout my website, outlining both my bio info, contact details and descriptions of projects or bodies of work. This is the fruition of years of searching not only for a graphic that best represents me, but also searching for a visual style in my photography.
This arrangement of text and characters represents my obvious taste for things that are dramatic yet subtle, while being overall clean and thought out.
Branding is important for any business today, with everyone having a website and crying out for attention. A brand is your identity, and it’s what people will use to remember you, whether you have a graphic logo or a simple arrangement of text like me. I have explored graphic logos in the past and just didn’t feel comfortable with how they represented me, so I chose a specific font – two of them in fact, and went forward from there. The font is the voice that your clients will “hear” upon reading your name and information, so it’s important to pick one that best represents your work.
I then used the subtle graphics – the brackets – for certain things on the site. I didn’t want to use them for everything, like framing every photo in every portfolio with them, that would be too much. But using them in descriptions works well, and it’s a subtle reminder of who’s work you are looking at.
Branding takes a long time. Make some designs or come up with some ideas of your own. Show them to friends, family, peers, anyone who will look at them. If necessary, go to a graphic designer – this is what they are paid to do.
Over time, people will come to remember this logo or brand, so make sure it’s everywhere your business is. Business cards, promos, etc. It will make your work more recognizable and your clients take you more seriously.
Printing 101 – On the Epson 3800
Even in this digital age photography is still primarily used as a print medium. Sure we have websites to send potential clients to to get a taste of our work and style, but if they want to hire you, they are going to ask to see your “book.”
The Epson Stylus Pro 3800 is the best printer I have ever used, it’s fast it creates beautiful prints and it’s easy to use. It’s expensive, but you can go to printing labs that have them and specify what you need.
Prepping photos for web use and print use are two totally different beasts. Your photos on the web are seen on monitors, all of which are calibrated differently for color and contrast. So in order to make the best prints possible, you need to get details in your shadows while controlling your highlights. This of course, starts with your exposure.
Expose for the print
When you’re shooting RAW you have always been taught to “expose to the right” which is getting as much information to the right side of the histogram as possible. This is very important when it comes to making prints.

A nearly perfect histogram.
You don’t want the histogram to clip on either the left or right side, this results in a loss of data or in print terms, a loss of detail.
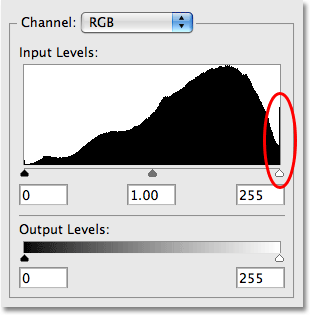
A clipped histogram - loss of highlight details.
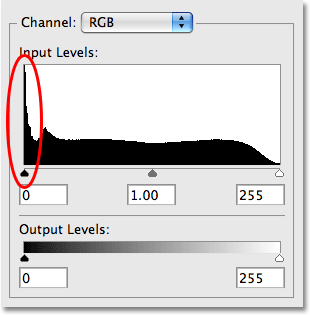
A clipped histogram - a loss of shadow detail.
If you lose detail in the shadows, your print will come out with pure black areas. This looks strange, but not nearly as strange as loss of highlight detail – the printer will actually not print on a highlight area of 255, it will simply leave it as whatever paper surface you used. This will look very strange.
Adjustments in Adobe Camera RAW
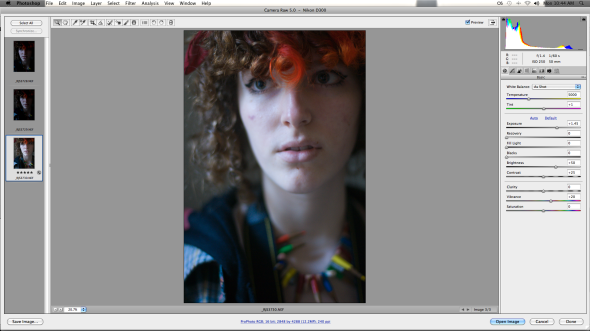
The first thing you will want to do with your RAW file is change your workflow options which is the blue line of text on the ACR screen. I use ProPhoto as a color space because it gives me the most color options even though printers can’t print the color range of ProPhoto yet. You want your bit-depth to be 16-bit, and you do NOT want it set to sharpen anything.
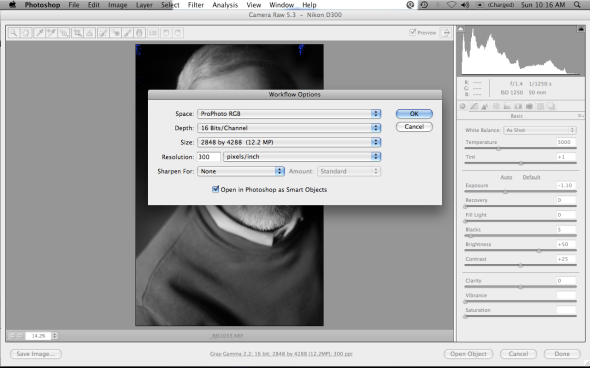
What your workflow should look like.
Now adjusting your highlights and shadows really depends on what kinf of paper you will use. I prefer Epson’s 5-star premium luster photo paper. So to print for that, your shadows should be no lower that 12-15 in RGB. You can adjust your blacks by adjusting the “Blacks” slider. Camera RAW’s default is 5, and if you shot at a low ISO you can safely reduce this with minimal noise. You can also adjust the “Brightness” slider which isn’t as effective but it works if your at 0 in your “Blacks” slider and still need to get detail back. Be wary of your highlights though. The “Fill Light” slider works well, but you will get crazy noise in your shadows if you go beyond 20. If your printing on Matte paper, your shadows will need to be higher, no lower than 20. Matte paper absorbs more ink, so you will lose that detail fast.

Your Basic Adjustment options.
As far as highlights go, if you want to retain detail and not got that weird not-quite-blown-out look, you should keep your highlights around 240, 245. You can use the “Recovery” slider, but it won’t really bring your detail back – it simply adds magenta to the overall image, which will also gray it out the rest of your colors if you get carried away. It’s a good rule of thumb to not use the slider beyond 25. All of this adjusting is done to get as much information to the right side of the histogram as possible, without clipping anything.
Sharpening
All digital images need sharpening. You can do this in Adobe Camera RAW by using the “Clarity” slider, but if you plan to make any local adjustments it’s probably best to do the sharpening in Photoshop. There are a variety of sharpening methods in Photoshop such as the “unsharp mask” and my personal favorite, “smart sharpen.” These work well for different things, but they can both be masked out to sharpen certain areas a certain amount. DO NOT use the “Sharpen” button or the “Sharpen edges” button. They give you absolutely no control. Sharpening can be tricky, you need to watch the fine details such as the hair or eye-lashes when you’re working. A good rule of thumb is sharpen it to the point where it looks a little strange on the screen – the image will print slightly softer.
The rest is all trial and error. Learning by doing. Try different papers, different printers. These are just basic rules, and rules were meant to be broken. Learn these rules well before you explore outside of these boundries. Then, you can clip your blacks. Clip your highlights. Get the right look for you.
An Introduction to lighting: Source sizes
Studio lighting or lighting you control can be a beast. Some of you may already know this visually, but are unaware of the technical way of things. So this will serve as a basic introduction to the qualities of light. Todays topic: Light Source sizes.
Small
A small light source, such as a single light bulb or a high lamp post will give you very harsh and contrasty shadows. This may sound familiar to some, and they may be thinking of the noon sun. The sun is billions of miles across, so how could it be a small source?? The answer is because it’s a million miles away. You can setup any light source at a great distance to give it a “Small” light source effect.
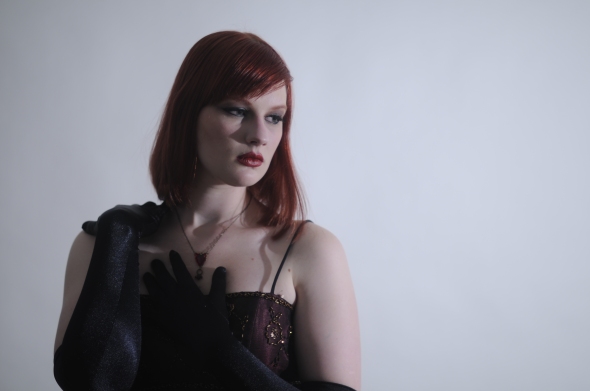
A photo lit with a single light bulb.
Notice the sharp shadow that her nose makes, and how the shadow is very distinct and has hard lines.
Medium
If you are using a single light bulb, you can simply move your light source closer to your model, effectively increasing it’s size and softening the shadows… but I wouldn’t recommend this. You would have to have a lightbulb only about two to three feet away from your model, and it might make them hot or uncomfortable. If you are using a clamp lamp, the kind you can purchase at a hardware store, you can simply put the reflector dish on it, which increases it’s size.

A photo lit with a medium size light source.
Notice that the shadows on her nose and arms get softer at the edges. It’s very important to not simply write off what I said about moving your light source. While moving your single bulb two feet from your model is inappropriate in this situation, the distance of your light source to your subject is *ALWAYS* the key, and should be first in your checklist when you are trouble shooting.
Large
A large light source will give you shadows that are very soft on all the edges, and barely noticeable all together. A large source can be a small light source that is very far away, or a strobe with a soft box attached or a clamp lamp reflecting light off of a large flat surface.

A photo lit with bounced light from a large flat surface.
If you are reflecting light, your light source will effectively take on the size of the surface you are reflecting it from, which will give you soft gorgeous light complete with soft shadows.
Painting
Something that’s a lot of fun to do is to “Paint” with a light source. Turn off your lights, set your camera to a long exposure (at least 10 seconds) and “Paint” your subject with a flashlight or other source.

A photo lit with a Cell Phone
Doing this will not only give you a cool looking photograph, but it actually gives you complete control over your light and shadows. While it is difficult to master, you can sculpt some very interesting light using this technique.
In closing
The important things to remember are this: A small or far away light source will give you sharp shadows and brilliant highlights. A large light source will give you soft, soft, soft everything. A medium size source is in between. Distance from your light source to your subject is always a solution. Keep your models happy.
Concert Photography 101
I’ve shot easily more than 150 bands in my time as a working photographer including local acts and bigger names and record labels.
It’s a fun field to get into, you get to see shows for free, get to meet the band, and usually get free drink tickets. Bands are very difficult to shoot, usually the venues they play are poorly lit, shows are crowded, and the band moves around a lot. So how can you successfully shoot a band and get awesome photos of the guitarist smashing his instrument on stage? Why, by reading this tutorial of course.
Getting in
Some people will go to all sorts of ridiculous trouble to sneak their cameras into shows – stuffing it in jackets, down pants, etc.
Thing is, it’s fairly easy to get a photo pass. You can contact either the band or the record label and ask if they need photo coverage for the show, send them a link to your portfolio and wait for a response. It may not be as exciting as sneaking past security with a 200mm lens in your pants, but you’ll get into the show for free if you get the pass.
Gear
Pack light. You should only need about 4-5 things. Your camera should be able to shoot well in low light or have noise reduction software built in. At a typical venue you will need to shoot at about 1000 – 1600 ISO and you will still be shooting at a shutter speed between 1/30 and 1/125, if you’re lucky. If you think you will have room for a tripod, bring it – but at a small venue or club I wouldn’t even bother. This is where it’s important to have good lenses. I bring a 50mm 1.4, a 19-35mm 3.5 and a 70-300mm 3.5/4.8 – the faster your lenses, the better. And of course, bring the usual – extra battery, extra memory cards, etc. Before you pack up your flash unit ALWAYS ASK IF YOU CAN USE ONE. I cannot stress this enough. You could interrupt and ruin the whole show by using a high-powered flash if the band doesn’t know about it. And trust me, you do not want to be on the bad side of a crowd who’s paid to see their most favorite band EVER while you are carrying $5000.00 worth of gear.
Shooting without flash
When faced with the possibility of shooting in low light with no flash unit and no tripod, some may panic. They jack up their ISO and send the band black and white photos to hide the noise from shooting at 2500 ISO and call it a day.
Now, this is ok in some practices but for me the colors and lights at a venue or club really set the mood of a show – many bigger bands have their own light set ups, so it would make sense to capture that in all it’s glory, am I right?
Instead of relying on a tripod or high ISO I would just focus on learning to have a steady hand. This can be difficult when you’re in a crowd, so find yourself a nice spot either right at the stage or against a wall or support beam and prop yourself against it. Frame your shot, tuck your elbows into your rib cage, take a deep breath and when you breath out slowly compress the shutter button. If you have a high frames-per-second option, use it.
Focusing in the kind of flashy-glitzy lighting that live shows are known for can be tricky. It’s really up to what you trust more – your auto focus, or yourself. Either way, know how far away from the stage you are and how your focusing works so you can make quick adjustments.
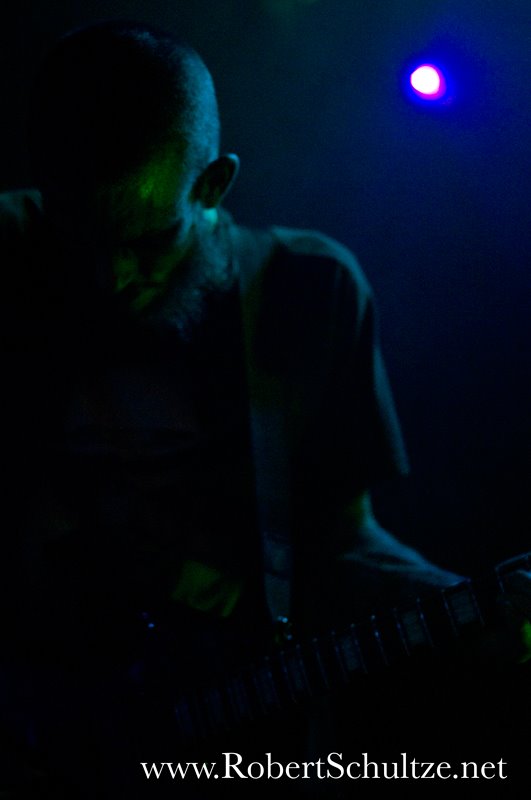
Shooting with flash
If your shooting with any flash at all, be it on camera or off you will need to make the photos interesting. I have a bit of an unorthodox method myself. I use my on camera flash – blasphemous, I know – in combination with long exposures.
The flash freezes my subject, and the longer exposure (usually no more 1 second) will give me glorious light trails from anything reflective, which results in a high energy shot full of motion and color.

It will also allow you to shoot at a much lower ISO and smaller aperture, and if you focus correctly it will be nice and crisp too.
General Tips
Use your lenses. Come in with your 50mm and get some medium shots, use the wide-angle and shoot from above or below or other extreme angles, and use your telephoto for close-ups. If the band is letting you shoot on stage, be respectful and do not interrupt their show by stepping in front of them while the lead-guitarist does a face-melting solo. Be mindful of the crowd, and don’t shove your way around. And since you’re there already, why not get a shot of the adoring fans?

Common Sense
Before you shoot any kind of live show – especially if it’s a metal or punk show – get your gear insured. It costs what, 200.00 a year? If it’s that cheap, how can you afford to not insure yourself? I can’t tell you how many times I’ve had gear broken, beer spilled upon it, or had it get stolen outright. Don’t take the risk.
Utilizing Natural Light
At some point, you are going to ask yourself a very important question: “Am I a studio light or natural light photographer?”
Each type of lighting has it’s own characteristics and benefits. Studio lighting is customizable, professional, and allows you to capture nearly everything you need the lighting for. Natural light is beautiful, available, classic and impossible to replicate.
Unfortunately, each type of lighting has a downside as well; Studio lights are cumbersome and difficult to transport, they need a power source, they are expensive, and they take time to set up. Natural light is uncontrollable, so your at the mercy of your environment.
I’m a big fan of natural light – Something about it just feels so right, and like I said above, you can’t replicate natural light in a studio. Let me introduce you to the most common lighting situations you will face out in the world.
Noon Light

Shooting at 12 noon will give you very hot or orange/yellow light. Since the sun is at it’s highest point in the sky, you will get very bright highlights and very dark shadows. Not saying it’s impossible to shoot it – I’m just saying you will have a hell of a time getting decent detail in both the shadows and the highlights unless you use a reflector or a fill-flash of some kind or you’re willing to work a little photoshop HDR magic.
However, this type of lighting takes up a large chunk of the day – from about 10am to about 4pm, so it’s convenient to shoot in. Which brings us to our next type of natural light:
Dappled Light

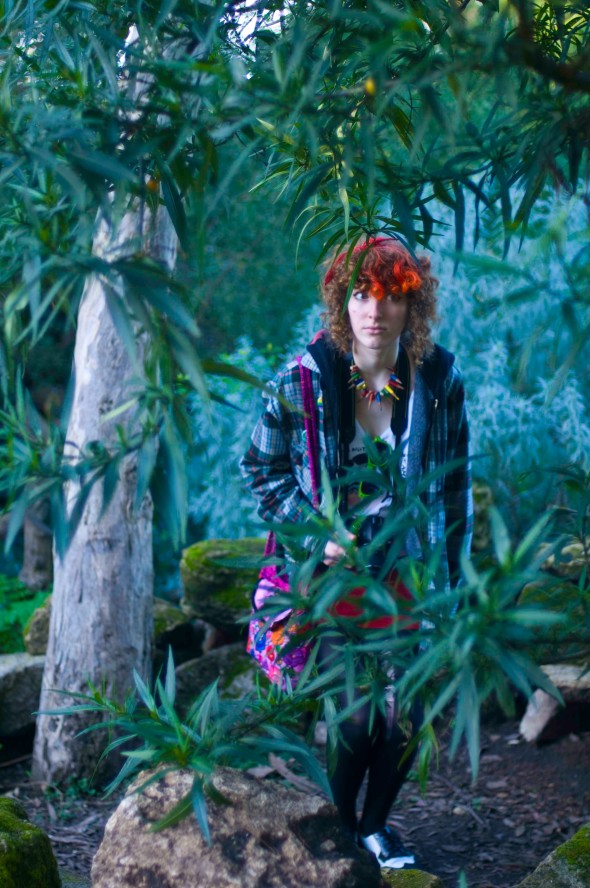
If the mid-day sun is too much for you to handle, try moving your subject under a tree. It’s so simple – the leaves and brunches take out the intensity of the sun enough so your subject doesn’t have to squint, and you get beautiful patterns of light all over your photo. If you use these patterns properly – like placing a highlight directly on your subjects face, it can work very well for you.
Warm vs. Cold
The best time of day to shoot is bright and early – between 5 and 7am, and later in the day before sunset. Morning light is significantly cooler or bluer than evening light. And you won’t get the harsh shadows created by noon light. If you shoot about an hour before sunset, you will capture a magical mood – in the film industry known as the “Golden Hour” because everything takes on an angelic glow – it’s beautiful, but you have to be prepared and work fast – you lose light very quickly during sunset.
This photo was taken in a gazebo around 6pm:

And this next photo is the same model, but taken much earlier in the morning:
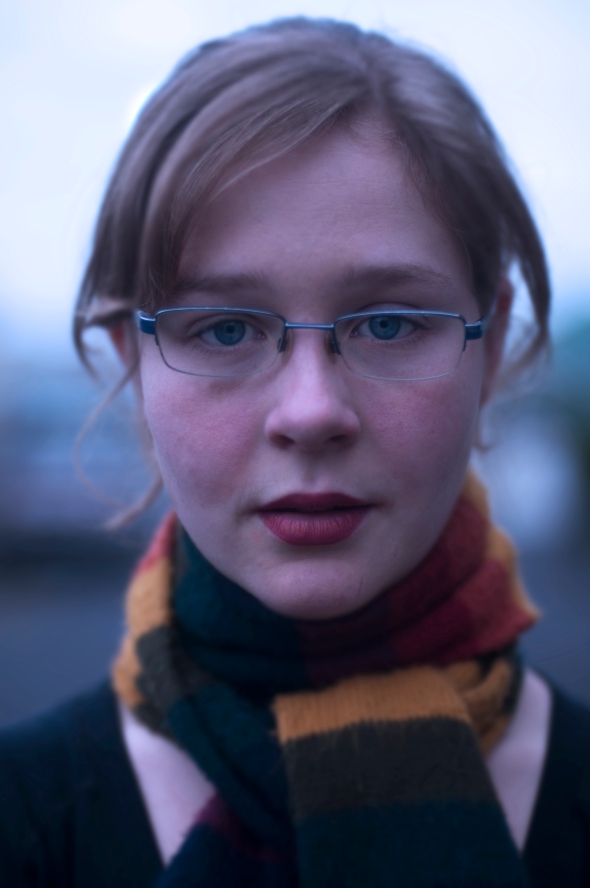
You can also get a similarly cold look from shooting in the shade or on a cloudy day. Each image cold and warm has it’s own feeling that you can utilize however you wish.
Window Light
I’ve saved the best for last. At any time of the day you can get what I consider to be the most beautiful lighting in the world… window light.

In all it’s simplicity, window light sure is versatile. You can place your subject right next to the window for more pronounced shadows and highlights or you can move your subject several feet from the window and get a much softer diffused light.
 And depending on the time of day, the thickness of the glass, the weather, etc – it will all change, which makes it not only very accessible but also very exciting to work with. You’ll never really know quite what you will get, but it will always be beautiful.
